About Me

- darkly dreaming
- Hello! I'm Crystal, aka darkly dreaming. I'm 34 and live in the Midwestern USA. I've been back into PSP since November of 2010. Prior to that I tried PSP for about a year back in 2005 or 2006. I've just recently begun trying my hand at tutorials. If you try one of my tuts and would like to show me what you made, please email me at darklydreaming33@hotmail.com. Happy Tagging!
I CT For


Forums I Haunt

Blogs I Follow


Saturday, October 1, 2011
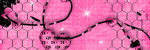
 Good Girl with Moments of Evil

This tutorial was written by me on 10/1/11.
Any resemblance to other tutorials is a coincidence.
Any resemblance to other tutorials is a coincidence.
Click on image to see full size.
Supplies:
1) Tube of Choice. I'm using one called "Olga" by Alex Prihodko. This is a PTU tube, which can be purchased at PFD.
2) Scrapkit of Choice. I'm using the PTU kit Cute Punk by Addictive Pleasures, which you can get at dreams-n-digital.
3) Creative By Nature Template 110, available here.
4) Mask of choice. I used WeeScotsLass Mask 167, available here.
5) Font of Choice
Plugins:
1. Eye Candy Gradient Glow
2. Xero, Radiance
Let's get Started....
1) Open Template. Duplicate (shift d) and close original.
2) Delete Copyright layer.
3) Select Raster 10. Select All, Float, Defloat. Open Paper 1 and copy and paste as new layer. Selections Invert, delete. Select none. Apply Eye Candy Gradient Glow with settings 5, 25, 100, Fat Black color on both sliders.
4) Delete original raster 10.
5) Select Raster 8. Select All, Float, Defloat. Open Paper 11 and copy and paste as new layer. Selections Invert, delete. Select none. Apply our Gradient Glow settings from before.
6) Delete original raster layer 8.
7) Repeat steps 5 and 6 on Raster 9.
8) Select Raster 7. Select All, Float, Defloat. Open Paper 5 and copy and paste as new layer. Resize by 70%. Selections Invert, delete. Select none. Apply our Gradient Glow from before.
9) Delete original Raster 7.
10) Select Raster 6. Select All, Float, Defloat. Open Paper 11 and copy and paste as new layer. Selections Invert, delete. Select none.
11) Select Raster 6 again. Select All, Float, Defloat. Copy and paste your close up tube as new layer, make sure it's above the Paper11 layer. Selections Invert, delete. Duplicate. On top layer change blend mode to Hard Light and lower opacity to 44. On bottom layer, change blend mode to Luminance (L).
12) Delete original Raster 6.
13) Repeat Steps 10-12 on Raster 4.
14) Select Raster 5. Select All, Float, Defloat. Add a New Layer. Change your Background Color to Black, and your Foreground color to #b120d5. Click on Foreground and change to gradient. Style Linear. Angle 180, Repeats 1. Flood fill your layer. Select none. Add drop shadow: 2,2,50,5 Black. Adjust, Add Noise, Gaussian 20, monochrome checked.
15) Delete raster 5.
16) Repeat steps 14-15 on Raster 3.
17) Copy and paste your main tube. Arrange in center. I erased the bottom portion of her legs so that it looks like she's coming out of the oval. Duplicate. Apply Xero, Radiance on the top tube. Change blend mode to Overlay and lower opacity to 55. On bottom layer, add drop shadow 2,2,50,20 Black.
18) Select Layer 1. Select All, Float, Defloat. Add a New Layer. Flood fill good girl with color # b120d5 (it will also fill in the M and t on Moments), and flood fill Evil with #651280. Adjust Add Noise with same settings as before. Right click and merge down all of our word art layers into one.
19) Open paper 3, copy and paste as new layer. Send to bottom. Apply our mask. Merge mask group. Resize layer by 130%.
20) Open Wire. Copy and paste as new layer above Raster 2 (our filled oval layer). Add Drop shadow: 2, 2, 50, 0 black. Then click on Raster 2. Select All, Float, Defloat. Click back on Wire layer. Selections, Invert, Delete.
21) Open heart 3. Copy and paste as new layer. Resize by 50%. Add drop shadow 2,2,50,0 Black.
22) Open Glitter. Copy and paste as new layer. Arrange to top left. Send to bottom. Duplicate, Image Mirror. Right click and merge down. duplicate. Image Flip. Right click and merge down so there's just 1 glitter layer.
23) Open chain. Copy and paste as new layer. Resize 70%. Apply previous drop shadow.
24) Open Skull. Copy and paste as new layer. Resize 40%. Apply previous drop shadow.
25) Open lips. Copy and paste as new layer. Resize 40%. Apply previous drop shadow.
26) Image, Canvas Size. Change to 700x650. Keep everything in the center. This will give us a little bit more room to add our copyright and name.
27) Add copyright and name.
28) Export png.
Thanks for trying my tut!
Subscribe to:
Post Comments (Atom)
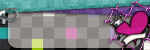
Grab My Blinkie


0 comments:
Post a Comment