About Me

- darkly dreaming
- Hello! I'm Crystal, aka darkly dreaming. I'm 34 and live in the Midwestern USA. I've been back into PSP since November of 2010. Prior to that I tried PSP for about a year back in 2005 or 2006. I've just recently begun trying my hand at tutorials. If you try one of my tuts and would like to show me what you made, please email me at darklydreaming33@hotmail.com. Happy Tagging!
I CT For


Forums I Haunt


Blogs I Follow


Monday, August 29, 2011
 You Make My Downstairs Wiggle Tut

This tutorial was written by me on 8/28/11.
Any resemblance to other tutorials is a coincidence.
Click on image to view animation.
Supplies:
1) Tube of Choice. I'm using one called "Salina" by Tim Lowery. This is a PTU tube, which can be purchased at PTE.
2) Scrapkit of Choice. I'm using the PTU kit Missy by Butterfly Kisses Scraps, available at Scraps & The City.
3) Eye Candii Graphicz Template Wiggle available here.
4) Mask of choice. I used WeeScotsLass Mask 302, available here.
5) Font of Choice
Plugins:
1) Pentacom Color Dot
2) Eye Candy Gradient Glow
Drop Shadow used throughout: 2, 2, 75, 10, black
Let's get Started....
1) Open Template. Duplicate (shift d) and close original.
2) Delete Copyright Layer
3) Add our drop shadow to these layers: Oval blurred, White Noisy Circles, White Noisy Circle Largest, White Circle Large Noisy, text: wiggle pixel, white noisy circles small, and thin white noisy layers.
4) Select Black Rectangle Layer. Select All, Float, Defloat. Open paper 14, resize by 75%, copy and paste as new layer. Selections Invert, delete. Select none. Add drop shadow.
5) Delete original Black Rectangle layer.
6) Select Pink Circle Left Back Layer. Select All, Float, Defloat. Open paper 25, copy and paste as new layer. Selections Invert, delete. Select none. Add Drop Shadow.
7) Delete Original Pink Circle Left Back Layer.
8) Repeat steps 6&7 on Pink Circle Right Back Layer.
9) Select Large Black Circle Layer. Select All, Float, Defloat. Open paper 17 copy and paste as new layer. Selections Invert, delete. Select none. Add Drop Shadow.
10) Delete original Large Black Circle Layer.
11) Select Pink Circle Large Layer. Select All, Float, Defloat. Open paper 12 copy and paste as new layer. Selections Invert, delete. Select none. Add Drop Shadow.
12) Delete original Pink Circle Large Layer.
13) Select Black Center Black Circle Layer. Select All, Float, Defloat. Open paper 18, resize by 50%, copy and paste as new layer. Selections Invert, delete. Select none. Add drop shadow.
14) Delete original Black Center Black Circle layer.
15) Select Pink Polka Dot Circles Layer. Select All, Float, Defloat. Open paper 2 copy and paste as new layer. Selections Invert, delete. Select none. Apply Pentacom Color Dot with settings: 90, 2, 255, 255, 255. Add drop shadow.
16) Delete original Pink Polka Dot Circles Layer.
17) Select Black Circle Small Right Layer. Select All, Float, Defloat. Open paper 18, resize by 50%, copy and paste as new layer. Selections Invert, delete. Select none. Add drop shadow.
18) Select Black Circle Small Right Layer again. Select All, Float, Defloat. Open close up tube. Copy and paste as new layer above the paper layer. Resize by 50%. Selections Invert, delete. Select None. Change layer blend mode to Luminance (L) with opacity 75%.
19) Delete original Black Circle Small Right layer.
20) Repeat steps 17-19 on the Black Circle Small Left layer.
21) Select Thin Pink Rectangle Layer. Select All, Float, Defloat. Open paper 17 copy and paste as new layer. Selections Invert, delete. Select none. Add drop shadow.
22) Delete original Think Pink Rectangle layer.
23) Select Text mmm Layer. Apply Eye Candy Gradient Glow with settings: 3, 25, 100, then medium, color white on the second tab. Right Click and send this layer to the top.
24) Select Text: you make my downstairs Layer. Select All, Float, Defloat. Open Paper 14, resize by 75% and copy and paste as new layer. Selections Invert, delete. Select None. Add Drop Shadow. Right click on this layer and merge down with the original text layer.
25) Select Text: Wiggle Layer. Select All, Float, Defloat. Open Paper 25 copy and paste as new layer. Selections Invert, delete. Select None. Add Drop Shadow. Right click on this layer and merge down with the original text layer. Then Right click and merge down with the You make my downstairs text layer. Then Right Click and merge down with Raster 13 layer. Then right click and merge down with thin white layers.
26) Move your merged word art/box layer down a bit if needed. See mine for placement.
27) Open main tube. Resize by 90% if you're using the same tube. Place where you want. Duplicate layer. On the bottom layer go to Adjust, Blur, Gaussian Blur, 3. On top Layer, change blend mode to Luminance (L) and opacity to 65%. Right click and merge down. Add drop shadow.
28) Open Paper 15 and copy and paste as new layer. Send to bottom. Apply Mask. Right click and merge Mask group.
29) Open Mesh 1. Copy and paste as new layer. Arrange just above your mask layer. Add Drop Shadow.
30) Open Sparkles. Copy and paste as new layer. Arrange in upper left. Duplicate. Image Flip. Right click and merge down. Duplicate again. Image Mirror. Right click and merge down. Add drop shadow. Send to bottom.
31) Open butterfly 4. Resize by 50%. Copy and paste as new layer. Place on upper right. Add Drop Shadow.
32) Open Bow 2. Resize by 40%. Copy and paste as new layer. Arrange at top of big circles. Add Drop Shadow.
33) Open Heart 03. Resize by 10%. Copy and paste as new layer. Arrange in center of the bow. Add drop shadow.
34) Open Hearts. Resize by 40%. Copy and paste as new layer under the merged word art layer. Arrange to the right. Duplicate. Image Mirror and arrange on the left. See my tag for placement.
35) Open Heart Doodle02. Resize by 40%. Copy and paste as new layer. Arrange to the bottom right. Duplicate. Image mirror. Right click and merge down. Add drop shadow.
36) Flood fill your background layer with color of choice. (Skip this if you want transparent background on your animation)
37) Add your name and copyright info.
Now let's get ready to animate.
38) Duplicate your main tube layer.
39) Hide the bottom tube layer.
40) Select the top tube layer and then pick your Mesh Warp Tool. Pick the 2nd column, 2nd row square on it and drag it up slightly to lift her bottom. Don't need to do too much.
41) Click back on your move tool and let it apply the warp.
42) Hide this top main tube layer we just warped.
43) Go to Edit, copy special, copy merged. Paste as a new animation in animation shop. Right click and select duplicate selected. You should have 2 frames.
44) Back to PSP and hide the normal main tube layer. Open the warped layer we had closed.
45) Edit, copy special, copy merged. Go to animation shop and click on frame 1. Right click and select paste after current frame to put this layer in between the two we had.
46) Ctrl A to select all 3 frames. Resize animation. Choose what size you want.
47) with all frames still selected, go to Animation, Frame Properties and set it to 40.
48) View your animation and then save optimized.
Thanks for trying my tut!
Saturday, August 27, 2011
Make Me Bad Tut

This tutorial was written by me on 8/27/11. Any resemblance to other tutorials is a coincidence.
Supplies:
1) Tube of Choice. I'm using one called "Super Sexy Babe" by Ismael Rac. This is a PTU tube, which can be purchased at xeracx.net.
2) Scrapkit of Choice. I'm using the FTU kit Bad Ass Chick by Kittz, available here.
3) CrazyCakesScraps makemebad Tag Template, available here.
4) Mask of choice. I used WeeScotsLass Mask 254, available here.
5) Font of Choice
Plugins:
1) Eye Candy Gradient Glow
Drop Shadow used throughout: 2, 2, 75, 5, black
Let's get Started....
1) Open Template. Duplicate (shift d) and close original.
2) Delete Copyright Layer
3) Select Layer 4. Select All, Float, Defloat. Open gb-p004 copy and paste as new layer. Selections Invert, delete. Select none. Add drop shadow.
4) Delete Layer 4.
5) Select Layer 2. With your magic wand tool, click inside the pink circle. Open B-P5 and Resize by 75%, then copy and paste as a new layer. Selections Invert, delete. Select none. Add drop shadow.
6) Select Layer 2 again. Select All, Float, Defloat. Add a new layer. Flood Fill Black. Make sure this layer is underneath Raster 3. Select none. Apply Eye Candy Gradient Glow with settings: 3, 25, 100 on tab 1. Then Medium and white on the second tab.
7) Select Layer 7. Select All, Float, Defloat. Open B-P5 and Resize by 75%, then copy and paste as a new layer. Selections Invert, delete. Select none. Add drop shadow.
8) Delete original Layer 7.
9) Repeat steps 7&8 on Layer 8.
10) Add Gradient Glow from before to badwords and badword2 layers.
11) Select Layer 6. Select All, Float, Defloat. Open GB-P6 and Resize by 110%, then copy and paste as a new layer. Selections Invert, delete. Select none. Add drop shadow.
12) Delete original Layer 6.
13) Select Layer 10. Select All, Float, Defloat. Open GB-P004 and copy and paste as a new layer. Selections Invert, delete. Select none. Add drop shadow.
14) Delete original Layer 10.
15) Repeat Steps 13&14 on Layer 9.
16) Select Layer 11. Select All, Float, Defloat. Open GB-P0038 and copy and paste as a new layer. Selections Invert, delete. Select none. Add drop shadow.
17) Delete original Layer 11.
18) Repeat Steps 16&17 on Layer 12.
19) Select Layer 13. Select All, Float, Defloat. Add new layer. In your foreground pallet, select black, in your background, #d80000. Then change your type to gradient with these settings: Angle 180, Repeats 0, Invert checked. Flood fill your layer. Select None. Add Noise: Gaussian, 35, Monochrome checked. Apply Gradient Glow with same settings as before. Add drop shadow.
20) Delete original Layer 13.
21) Repeat Steps 19 & 20 on Layer 14, except before filling with the gradient, go in and uncheck Invert.
22) Repeat Steps 19 & 20 on Layers 3 & 5, except change the gradient properties to Angle 90, repeats 3, invert checked.
23) Select Layer 1. Select All, Float, Defloat. Open GB-P004 and copy and paste as a new layer. Selections Invert, delete. Select none. Add Gradient Glow with same settings as before, except change your color to black. Add drop shadow.
24) Select Layer 1 again. Select All, Float, Defloat. Open up close up tube. Resize by 70% if you're using the same tube I am. Copy and paste as new layer above Raster 15. Selections Invert, delete. Select None. Change layer mode to luminance(L) and Opacity to 75%.
25) Delete original Layer 1.
26) Select Word Art Layer. Select All, Float, Defloat. Open gb-p002. Resize by 50% and copy and paste as new layer. Selections Invert, delete, Select None. Apply gradient glow with previous settings and color black.
27) Delete original word art layer.
28) Go to Image, Resize, 78%, all layers checked.
29) Open up your main tube, copy and paste as new layer. Arrange. Duplicate tube and on the top layer apply Xero Radiance with settings 1, 228, 103, 133. Change layer properties to soft light. Right click on top layer and merge down. Add drop shadow to merged tube layers.
30) Copy and paste GB-P6 as a new layer. Send to bottom. New Layer, From Mask, select your mask. Then merge the mask group together in your layers pallet.
31) Open GB-fencing. Resize by 80%. Copy and paste as new layer just above your Mask layer. Add Drop Shadow.
32) Open GB-Ticket. Resize by 70%. Copy and paste as new layer, arrange on bottom right. Add drop shadow.
33) Open GB-whip. Resize by 60%. Copy and paste as new layer under your ticket and arrange. Add drop shadow.
34) Open GB-lips. Resize by 40%. Copy and paste as new layer. Image, free rotate, right 30 degrees. Add Drop shadow.
35) Open GB-mask. Resize by 50%. Copy and paste as new layer. Image, free rotate, right 30 degrees. Add Drop shadow.
36) Add your copyright information + Name. Resize if desired and Export png. (Or add background color of choice and export jpg)
Thanks for trying my tut!
New Blog Design
As you may have noticed, I've had my blog redesigned!
I think it looks fabulous. Thank you Tamie.

I think it looks fabulous. Thank you Tamie.
Saturday, August 20, 2011
Picture Perfect Tut

This tutorial was written by me on 8/20/11. Any resemblance to other tutorials is a coincidence.
Supplies:
1) Tube of Choice. I'm using one called "Angel" by Jose Cano. This is a PTU tube, which can be purchased at PTE.
2) Scrapkit of Choice. I'm using the PTU kit Bubblegum Pink by Designs By Ali, which I got at Scraps With Attitude. Ali is saying goodbye and Scraps with attitude is closing at the end of August so get the kit while it's still available.
3) Deb Tag Template 118, available here.
4) Mask of choice. I used WeeScotsLass Mask 282, available here.
5) Font of Choice
Plugins:
1) Tramages, Tow the line
Drop Shadow used throughout: 2, 2, 60, 10, black
Let's get Started....
1) Open Template. Duplicate (shift d) and close original.
2) Delete Copyright Layer
3) Select Raster Layer 19. Select All, Float, Defloat. Open paper 8 copy and paste as new layer. Selections Invert, delete. Select none. Add drop shadow.
4) Delete Raster Layer 19.
5) Repeat Steps 3 & 4 on Raster Layer 17.
6) Select Raster Layer 18. Select All, Float, Defloat. Open paper 18, resize by 75%, copy and paste as new layer. Selections Invert, delete. Select none. Add drop shadow.
7) Delete Raster Layer 18.
8) Repeat Steps 6&7 on Raster Layer 16.
9) Add drop shadow to Raster Layers 13, 14, &15.
10) Select Raster Layer 12. Select All, Float, Defloat. Open paper 2 copy and paste as new layer. Selections Invert, delete. Select none. Add drop shadow.
11) Delete Raster Layer 12.
12) Select Raster Layer 11. Add Drop Shadow. Add Noise 20%, Uniform, Monochrome checked.
13) Select Raster Layer 10. Select All, float, Defloat. Add New Raster Layer. Set your foreground and background colors to 2 colors from your tube. Flood fill with gradient settings: Linear, 45 degrees, Repeats 5. Apply Tramages, Tow the Line with settings: 80, 54, 48, 9. Add Drop Shadow.
14) Repeat Step 13 on Raster Layer 9.
15) Re-Select Raster Layer 10. Select All, float, Defloat. Copy and paste Your close up tube. Re-size if needed (I resized by 80%). Selections invert, delete. Change layer blend mode to Luminance (L).
16). Delete Raster Layer 10.
17) Repeat steps 15 & 16 on Raster Layer 9.
18) Select Layer 7. Select All, Float, Defloat. Add New Layer. Flood fill with gradient from before. Select None. Apply Eye Candy 4000, Glass with default settings.
19) Delete Layer 7.
20) Merge Down Layers 5, 6, Shadow 1, Raster 10, 8 and Shadow 2. Reposition Merged Word Art layers where you want.
21) Add drop shadow to Layer 4.
22) Select Layer 3. Select All, Float, Defloat. Copy paper 10, resize by 50%, paste as new layer. Selections Invert, Delete. Add Drop Shadow. Add noise with same settings as before.
23) Delete Layer 3.
24) Select Layer 2. Select All, Float, Defloat. Copy paper 20 paste as new layer. Move to where you don't have any black circles in the star. Selections Invert, Delete. Add Drop Shadow. Add Noise with same settings as before.
25) Delete Layer 2.
26) Repeat steps 24 & 25 on Layer 1.
27) Image Resize all layers 80%.
28) Copy and paste your main tube.
29) Select Raster Layer 5. Select All, Float, Defloat. Click on your main tube Layer. Selections Invert. Use your eraser to eraser the bottom part of your tube. Select none.
30) Add drop shadow to your main tube.
31) Bring your merged word art layer to the top.
32) Copy and Paste Paper 27 as a new layer. Send to bottom. Apply Mask. Merge Group.
33) Open Flower 5. Resize by 30% then by 70%. Add drop shadow. Duplicate. Image mirror and arrange.
34) Add any other embellishments if you want. I just added the one.
35) Add your copyright information and text. Resize all layers if you want a smaller tag and export your png or jpg.
Thanks for trying my tut!
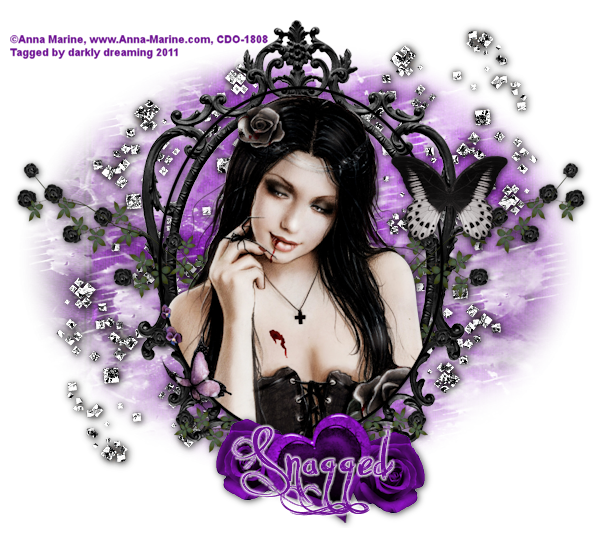
Anna Marine Sovereign Heart Extras
Made this tag from a scrapkit challenge at the Addictive Pleasures forum and decided to turn it into some snaggable extras as well. Click on each image to get the full size.


Saturday, August 13, 2011
Kiss My Attitude Tut

This tutorial was written by me on 8/13/11. Any resemblance to other tutorials is a coincidence.
Supplies:
1) Tube of Choice. I'm using one called "Star 2" by Jose Cano. This is a PTU tube, which can be purchased at PTE.
2) Scrapkit of Choice. I'm using the PTU kit Punk Star 3 by Toxic Desirez, available at several stores, I got mine at Digi Divaz.
3) Kat & Kristin Collab Template 3, available here.
4) Font of Choice, I used Jack the Hipper.
Plugins:
1) Pentacom Dot & Cross
2) Eye Candy 4000 Glass
3) Eye Candy 4000 Gradient Glow (optional, used on my name)
4) Lokas 3D Shadow (used on my name)
Drop Shadow used throughout: 3, 3, 50, 10, black
Let's get Started....
1) Open Template. Duplicate (shift d) and close original.
2) Delete Copyright, Black Square 2 & White Square 2 Layers
3) Image, Canvas Size, 750x700, align Center (both vertical and horizontal)
4) Select the White Square 1 layer. Select All, Float, Defloat. Open paper 23 copy and paste as new layer. Selections Invert, delete. Select none. Apply Pentacom Dot & Cross with settings, 72,10,2. Add drop shadow.
5) Delete original White Square 1 layer.
6) Repeat Steps 4&5 on Copy of White Square 1 layer.
7) Apply Drop Shadow to Black Square1, copy of Black Square1, Radiating, Aqua Circle and Black Circle Frame layers.
8) Select bottom Black Rectangle Layer. Select All, Float, Defloat. Open paper 17, Resize by 70%, copy and paste as new layer. Selections Invert, delete. Select none. Add Drop Shadow.
9) Delete Original Black Rectangle Layer.
10) Repeat Steps 8&9 on the other Black Rectangle Layer.
11) Select Bottom Stars Layer. Select All, Float, Defloat. Open paper 16 copy and paste as new layer. Selections Invert, delete. Select none. Add Drop Shadow.
12) Delete Original Stars Layer.
13) Repeat Steps 11&12 on second Stars Layer.
14) Select White Circle Layer. Select All, Float, Defloat. Open paper 6 copy and paste as new layer. Selections Invert, delete. Select none. Add Drop Shadow.
15) Delete Original White Circle Layer.
16) Select Lips Layer. Select All, Float, Defloat. Open paper 2 copy and paste as new layer. Selections Invert, delete. Select none. Add Drop Shadow. Change Layer Opacity to 65%.
17) Delete Original Lips layer.
18) Add drop shadow to Word Art Back Layer.
19) Select Word Art Layer. Select All, Float, Defloat. Open paper 4 copy and paste as new layer. Selections Invert, delete. Select none. Apply Eye Candy 4000 Glass with default settings.
20) Delete original Word Art layer.
21) Merge Word Art and Word Art Back layers together. Move slightly down and to the right.
22) Copy and paste your tube as a new layer. Add drop Shadow.
23) Copy and paste element Sparkles.
24) Copy and paste element Splatter 1. Move to top Left. Duplicate. Image Mirror. Merge the two layers together. Add drop shadow. Arrange, send to bottom.
25) Duplicate the merged splatter layer. Image Flip.
26) Open element dragonfly. Image Mirror. Resize by 50%. Copy and paste as new layer. Arrange to the right. Add drop shadow.
27) Open element lips. Resize by 50%. Copy and paste as new layer. Add drop Shadow. Arrange at bottom Right. Duplicate Layer. Image Mirror. Move to top Left.
28) Add copyright information + Name. Resize if desired and Export png. (Or add background color of choice and export jpg)
Thanks for trying my tut!
Saturday, August 6, 2011
Biatchitude Tutorial
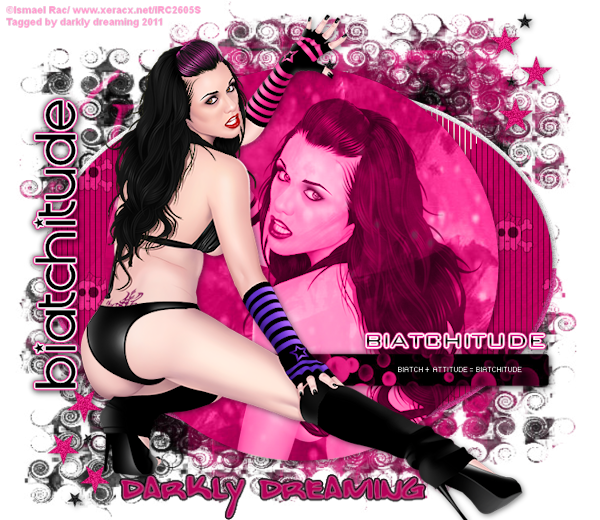
This tutorial was written by me on 8/6/11. Any resemblance to other tutorials is a coincidence.
Supplies:
1) Tube of Choice. I'm using one called "Carrie" by Ismael Rac. This is a PTU tube, which can be purchased at xeracx.net.
2) Scrapkit of Choice. I'm using the PTU kit Drama Beeotch by Mystical Illusionz, available at Scraps & The City.
3) Missy Tag Template 269, available here.
4) Mask of choice. I used WeeScotsLass Mask 258, available here.
5) Font of Choice
Plugins:
1) Tramages, Tow the Line
2) Eye Candy Gradient Glow (optional, used on my name)
Drop Shadow used throughout: 2, 2, 50, 10, black
Let's get Started....
1) Open Template. Duplicate (shift d) and close original.
2) Delete Copyright, Stars & Background Layers
3) Image, Canvas Size, 750x650, align Center (both vertical and horizontal)
4) Select the Oval Layer. Select All, Float, Defloat. Open paper 1, resize by 75%, copy and paste as new layer. Selections Invert, delete. Select none. Apply Tramages, Tow the Line with settings, 80,54,48,9. Add drop shadow.
5) Delete original Oval layer.
6) Select Circle Layer. Select All, Float, Defloat. Open paper 3, copy and paste as new layer. Selections Invert, delete. Select none. Add Drop Shadow.
7) Select Circle Layer Again. Select All, Float, Defloat. Open close up tube. Resize by 80% if you're using the same tube I am. Copy and paste as new layer above the paper circle layer. Selections Invert, delete. Select None. Change layer mode to luminance(L) and Opacity to 75%.
8) Delete original Circle Layer.
9) Select Rectangle Layer. Select All, Float, Defloat. Open paper 7, Resize by 75%, copy and paste as new layer. Selections Invert, delete. Select none. Add Drop Shadow.
10) Delete original Rectangle Layer.
11) Select Words Layer. Add drop shadow. Repeat for Wordart 1 & Wordart2 layers.
12) Move Wordart 1 Layer to the left slightly. See my tag for placement.
13) Copy and paste main tube and place as desired. Add Drop Shadow.
14) Open Paper 5. Copy and Paste as new layer. Send to bottom. Apply Mask and Merge Group.
15) Open Element 9. Copy and Paste as new Layer. Duplicate. Image Mirror. Image Flip.
16) Select top element 9 layer and right click, select Merge Down. Move merged layer down to just above Mask Layer. Add Drop Shadow. Add Noise, 35% uniform, monochrome checked.
17) Add copyright information + Name. Resize if desired and Export png. (Or add background color of choice and export jpg)
Thanks for trying my tut!
Subscribe to:
Posts (Atom)
Grab My Blinkie


